
Introduction
In this chapter you’ll learn how to prepare for and record interviews, whether stand-alone or as part of a bigger video project (e.g. documentary film).
| |
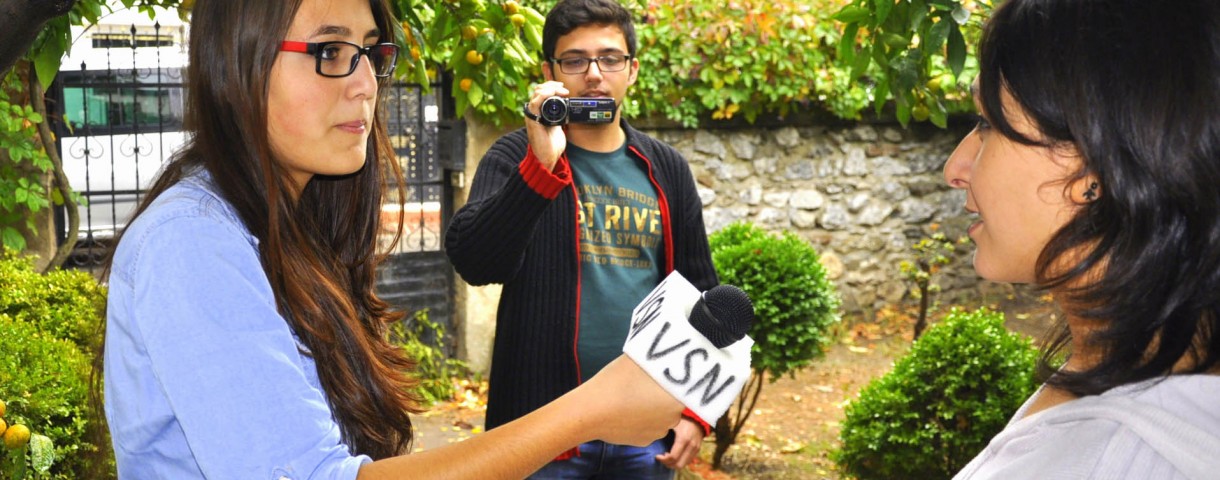
Vision in action |
|
|
||
Equipment and tools
Camera
You can record an interview with any type of camera. You may want to use a tripod to make sure the picture is smooth, without any shakes or jolts.
The type of lens you use will determine where you can film, and what the distance should be between the camera and the interviewee(s).
See Camera basics and Camera advanced for information on framing and lens types for interviews.
Light
Check the available light at the location where you want to film and bring any additional lighting you need. This can include lights on tripods, a video light (a light you can attach directly to the camera), or a single strong light you can point at the ceiling to illuminate the room indirectly with softer light. Always take additional lights with you if you don’t know what the conditions are like on location. [1]
See Basics of lighting for information on how to use lights in your video.
Sound equipment
You’re filming an interview, so it’s important to be able to hear the speakers clearly. Lapel microphones are great for this, but you can also use a hand-held microphone or a microphone attached to a boom. Whichever type you choose, make sure that you place the microphone close to the interviewee’s mouth.
Depending on the type of interview, you might decide that background sound is also important to the message. For example, if you’re interviewing a baker at work, including noise from the bakery will help you create the right atmosphere.
Sound, music and sound effects will give you more information on recording and editing sound.
Main section
Filming an interview usually requires good preparation. Here are the main the things you’ll need to think about:
- What material (image and sound) do you want from the interview?
- Are you interviewing just one person or several people at the same time, for example if there is a specific relationship between them?
- Do you want to evoke a particular emotion in the interviewees? If so, how can you achieve this?
- What information do you want the interviewees to give you, and what do you want to add in the narrator’s voice-over?
- Is the interview stand-alone, or is it part of a wider project?
- What is the central question of the interview? How does this relate to the wider project (if there is one)?
- What do you expect people to say in the interview, and how does this fit in with the wider project?
Preparing for the interview
In an interview, you will usually be looking for answers to the following six questions, especially if you’re reporting on a newsworthy event:
- What happened?
- Who was involved?
- Where did it happen?
- When did it happen?
- How did it happen?
- Why did it happen?
These are known as the ‚five Ws and one H‘, and sometimes also as the ’six Ws‘.
It’s important to be well informed about your interviewee, before you interview them. If possible, read, watch or listen to other interviews they’ve given too. This will help you avoid asking them questions they’ve answered many times before. It also means you can ask the interviewee to confirm facts you researched or to comment on them.
Start the interview with questions that are not too difficult – for example, ‚Would you please introduce yourself?‘. This gives the interviewee a ‚warm-up‘ before you ask the more important questions.
No time to prepare? Don’t panic!
You won’t always have time to prepare thoroughly for every part of the interview process.
The main thing to prepare is your central, most important question. Remember your six Ws too; they don’t require much work in advance.
Finally, don’t be afraid to use the interview to get all the information you need. And yes, this includes asking your interviewee to introduce themselves if you have no idea who they are or don’t know much about them.
Concept and design of the interview set
First, decide whether you want both the interviewee and the interviewer to be filmed. This will determine whether you need just one camera or several.
If you’re only filming the interviewee, he or she should be placed in front of the camera. The interviewer then stands left or right of the camera, so that they have eye contact with the interviewee.
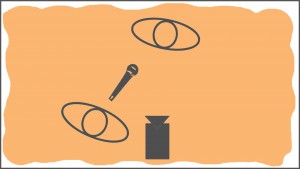

Position of the camera, microphone, interviewee and interviewer (left or right).
You should be able to see both eyes of the interviewee at all times, so avoid severe profile shots!
You’ll also need to decide on the camera angles and framing that you want to use, before the interview starts. If you’re working on a professional production, these will be defined in the script or storyboard. And the faces of any interviewees must be well lit.
As well as thinking about what you want to include in the picture, you’ll need to consider things in the background that you want to leave out. This could be rubbish, or random people who might distract the viewer. There might even be objects like street lamps or the edge of a wall that could appear on film as if they are coming out of the interviewee’s head. Make sure you avoid these.
It often makes sense to interview people in a setting that relates to them or to the content of a broadcast. If you’re using props, try to pick ones that are not too cliched or stereotypical, like a stethoscope for a doctor.
It’s a good idea to shoot some video content that relates to the interviewee and what they are saying. These so-called sectional images can be inserted later during the editing stage to make the final result more interesting.
[Illustration structure interview setting and / or photo]
Framing types
You can use all the typical framing types in your interview.
A total shot at the start would help you illustrate the interview situation as a whole. A waist or portrait shot captures essential information like facial expressions, gestures and body language. Detail shots of the face or the hands can then be used to focus on the interviewee’s emotions.
Interviewer and crew: To be seen or not to be seen?
Another thing to decide on before you start filming is whether the interviewer and even the crew should be filmed as part of the interview.
Here are a few things to consider:
- Seeing the interviewer or the camera crew at least occasionally makes the process of filming the interview more transparent. The viewer can reflect on the production, and becomes aware that what is shown is not necessarily an objective reality.
- For projects involving children and young people, showing everyone who helped out in the actual film can be a great source of pride and enjoyment.
- What is the role of the interviewer? If they are simply collecting information and their personality and opinions don’t matter, there’s no need to show the interviewer. But if, for example, you’re producing an in-depth report, and the interviewer is the one visiting different places, commenting on events and speaking to various people, then they should be seen regularly, in addition to providing a voice-over.
Some documentaries leave the interviewer out of the film completely. The viewer never sees or hears them, and the story is told entirely through pictures and what the interviewees say. This helps the audience immerse themselves in the story, just like with a feature film.
Making an interview with one camera
When an interview is filmed with just one camera, there is a lot of pressure on the camera operator. There simply mustn’t be any errors in the image and sound material.
The camera operator will also need to use different angles and framing types to make the image material more visually interesting. The angles and framing types will have been planned in advance by the scriptwriter.
You might want to begin and / or end the interview with a pan or tilt – for example a shot from a window at the interview location while sound from the interview is already playing. You can end the video with a pan from the interview location to a specific object, or a view filmed away from the interview location.
Pans and tilts aren’t always easy to do, and you can’t afford to make mistakes while you’re filming the actual interview. To help you get interesting image material, ask the interviewer and interviewee to keep talking after the interview is finished, and take some panning or tilting shots of them at that point. At the editing stage, cross dissolve between the pan and the interview; any unsynchronised lip movement won’t be visible.
A brief conversation after the interview also allows you to take close-up shots, for example of the interviewee’s hands. These can be inserted at appropriate points in the interview during the editing stage.
Equally, the camera operator, interviewer and interviewee could agree in advance that the interview can be interrupted at appropriate intervals to set a different camera angle or type of framing. This avoids unnecessary zooming and wobbles.
Another way to achieve framing variety is to mix up the logical flow of questions before the interview starts. During editing, the logical order is restored. Placing the sections in a different order to that in which they were filmed can make it seem as if there were more changes in framing or camera angles than there actually were during filming. But be careful with this approach as some questions will build on information given in a previous answer.
Making an interview with several cameras
When you’re filming with more than one camera, you can assign a different framing type to each camera and show the interviewee using a variety of shots.
Alternatively, one camera can shoot both the interviewer an the interviewee, while a second camera switches between the interviewer and the interviewee, using different framing types.
If you have two cameras, it’s common to use the shot / counter-shot approach – one camera films the interviewer and the other the interviewee, with the cameras‘ lines of sight crossing each other.
Video: Interview with Jan Feddersen about homosexuality (in German, by WTV): three cameras use different angles and framing types, including wide total from above, middle total with both interviewee and interviewer, waist shots and close-ups of each individual following the shot/counter-shot principle.
As always, remember not to cross over the axis of action – the line of sight between interviewer an interviewee (see more in Basics of editing).
Depending on the kind of material you want, you could use a hand-held camera as well as cameras on tripods. Hand-held cameras and fast manual zooming are often used in TV programmes aimed at young people, as they make the picture a lot more dynamic.
How the interviewer should behave
It’s important that the interviewer listens carefully to the interviewee’s answers during the interview. It’s the only way the interviewer can present an alternative view or challenge the interviewee if they don’t answer the question.
A good interviewer is always looking for eye contact with the person they are interviewing. This makes the interviewee feel they are being listened to, and they’re not just speaking in front of a camera.
The interviewer also needs to speak clearly, so that the interviewee understands the question. This also mean that the question itself can be recorded and used later if necessary – for example if it’s not clear from the interviewee’s answer what the question was.
The interviewer’s facial expression can really affect the facial expression of the interviewee. If you smile, you’re likely to get a smile back.
It’s important to ask open rather than closed questions. That way answers will be given in complete sentences and not just single words.
Closed questions like ‚Do you like the city?‘ can easily be answered with ‚Yes‘ or ‚No‘, and you can’t really go anywhere from there.
Open questions like ‚Why do you like the city?‘ encourage the interviewee to give reasons and to answer in complete sentences.
You can also ask an interviewee to answer in complete sentences and to repeat the content of the question in the answer. For example:
Question: ‚What happened at the open day today?‘
Answer, with the question integrated: ‚Today, on the day of the open house, visitors had the opportunity to look at all departments of the university.‘
This gives you the choice of cutting out the interviewer’s questions at the editing stage, and telling a story just by stringing together the interviewee’s answers.
Typical workflow of an interview production
- Contact the interviewee and agree when to meet. Give them as much detail as possible, from the topic of the interview to parking at the location, etc.
- Make sure you have permission to shoot at the location.
- Prepare your questions (use the six Ws), and decide how you’ll get introductory shots and any sectional images.
- If the interviewee asks for the questions, provide them a few days before you meet. Alternatively, discuss the questions with your interviewee right before the interview.
- Contact the interviewee a day or two before the interview to confirm it’s taking place and to thank them for taking part.
- Get the necessary equipment together.
- For a typical static interview set-up: at least one camera on a tripod; lighting using available natural or artificial light, or up to four additional lights (see Basics of lighting); lapel microphone for the interviewee and lapel or hand-held microphone for the interviewer (see Sound, music and sound effects).
- For a typical survey set-up: A shoulder or hand-held camera, lighting using available natural or artificial light, and/or video light.
- Choose a suitable spot for the interview. It should ideally be a nice place with good light, and it should be relevant to the interviewee or topic.
- Position the interviewee, interviewer, props, camera operator and sound engineer where you want them to be.
- If you’re using one camera only: Decide when the interview can be paused so you can change the camera angles and framing. Agree these pauses with the interviewer and interviewee. Stopping to make changes will help you avoid camera wobbles and zooming during the interview itself.
- If you’re using several cameras: Decide which type of framing / angle each camera will use. For example, camera 1: wide total, middle total, American; camera 2: close-up.
- Nominate someone to give the go-ahead for filming – using words like ‚Go!‘, and ‚Action!‘ – and interrupt the recording if necessary.
- The interviewer should introduce themselves, and explain why the interview is being filmed and where it will be published. The interviewer should then ask the interviewee to:
- look at the interviewer, not the camera. The interviewer should ideally hold the questions up so that they don’t have to look down repeatedly to read them out.
- always answer in full sentences, rather than simply using ‚yes‘ or ’no‘. If a question is answered with a ‚yes / no‘, the interviewer can ask a supplementary question – for example ‚why‘ – to encourage the interviewee to give more detail.
- include the question in their answer – for example answering the question ‚Why are you taking part into project XYZ?‘ with ‚I’m taking part in project XYZ because …‘
- Repeat these instructions if the interviewee doesn’t follow them.
- Ask questions again if the interviewee isn’t answering them, or ask alternative questions to help you get an answer.
- The interviewee should sign a consent form to allow you to publish the interview. They should do this immediately after the shoot is done; earlier if possible. If the interviewee asks to see the final cut first, wait for them to watch the interview, and then ask them to sign the consent form.
- Film a few shots that you can use to introduce the location/topic of the interview and as sectional images. [4]
The survey: a special kind of interview
The same basic set-up rules apply to a survey as to a conventional interview. The interviewee is facing the camera and looking at the interviewer, who is standing left or right of the camera.
Interviewees – usually passers-by – stand in the left or the right part of the picture according the rule of thirds. A change of framing types and position (interviewee A is filmed on the right of the shot, while interviewee B is filmed on the left) can make the survey more interesting visually.
Surveys are often filmed using a shoulder or a hand-held camera to give the camera operator more flexibility. You can use different camera angles and make the most of any available light, natural or artificial. Use a video light to illuminate interviewees‘ faces if necessary.
Video: A survey by pupils about prejudices againgst men and women (in German, by WTV):
an example of an interview using hand-held or shoulder cameras
When you’re filming a survey, you don’t have much time to ask passers-by to fill in a declaration giving their consent for the material to be broadcast. It’s a good idea to ask them on camera ‚Are we allowed to publish this recording on the internet, via television, etc …?‘) as your first or last question, and record their answer. That way you’ll have proof of consent for future reference.
Editing the interview
Decide how long the edited interview will be, ideally before you start filming but at the latest before you start editing. This will really help you when you’re watching and ordering the interview material and any sectional shots.
In case you used several cameras for filming the interview, go to the chapter Film editing with film editing software to learn how to synchronize several video and audio tracks.
The original list of interview questions can be used to guide the editing process. There might be additional questions asked during the interview, so look out for those too.
Summarising the answers in note form, or transcribing them in full if necessary, will give you a good overview of what was said. Now you can begin to restructure the content and edit it.
You might want to keep certain passages that have strong emotional impact, even if they don’t provide a lot of useful information.
If the interviewee has integrated the questions well into their answers, it’s a good idea to leave out the interviewer’s questions at the editing stage. This will avoid repetition and make the interview shorter.
It’s possible that you’ll have to cut content even when you really don’t want to, because the interview needs to be shorter. Where shortening a single long passage isn’t possible, you can remove the passage altogether and summarise the information using a voice-over and sectional images, possibly played over a near-muted part of the interview.
Individual shots should ideally be 10sec long at the most. This will ensure sufficient variety of different camera angles and framing types. But you can have longer shots too, if the aesthetics of your project require it.
Use sectional images as necessary to illustrate the sound material from an interview.
There is disagreement among film-makers about whether it’s stylistically valuable to illustrate the spoken word directly or whether picture and sound should never depict the same thing at the same time.
This often depends on the context. If you’re using an interview to portray a skateboarder, there is no need to explain verbally what he is doing if he’s shown skating. But if there’s a special trick he wants to explain, showing images of him performing the trick while he talks about it will help the audience understand the trick better.
Sound-editing for interviews
The voices of the interviewer and interviewee should always be well balanced in volume and clearly audible. Slips of the tongue, loud breathing noises and ‚hmmmm’s in the audio track can be removed.
Cuts between shots appear smoother if we can hear the voice of the person to be shown in the next shot before we actually see them.
If you have shots and counter-shots of the interviewer and interviewee, you can make the video more interesting by showing one person’s reaction while we listen to the other.
Exercises
- Watch interviews on TV and on the internet, and discuss how they were produced and designed. In particular, look at the position of the cameras, camera angles, types of framing, the lighting, and how image and sound material are edited.
- Create a typical interview set-up in different places and conditions, or run a survey. Think about how you need to position cameras, people, lighting, background and props.
- Produce a mock-interview in which the interviewee consciously doesn’t stick to the rules from time to time, to test if the interviewer can spot the deviations and correct them. Include visuals that introduce to the topic / place, sectional images, etc, as you would for a real-life interview.
- Discuss the filmed material. Focus on design aspects such as angles, framing and quality of light, as well as on sound quality, the content of the interview, quality of sectional images and introductory visuals.
Common mistakes
- The lapel microphone is too far from the mouth (more than 15 cm away), it’s not pointed at the mouth, or it moves out of place during the interview.
- The interview isn’t properly lit. Be patient and give yourself time to get the lighting right.
- Crossing the axis of action. This can happen easily if you’re using a hand-held / shoulder camera.
- We see the interviewee in profile rather than facing the camera. Make sure both eyes are visible at all times.
- Continuity errors: for example a person holds a glass in his left hand in one shot, and in his right in the next. This would seem very odd to the viewer if they haven’t seen the glass change hands. [3]
Related topics and links to external sources
Chapters: Camera basics / Camera advanced / Basics of lighting / Sound, music and sound effects
[Example form for rights to the image]
Methodology
There is a lot of detail about producing interviews in this chapter, which can be overwhelming for children and young people.
If you’re guiding them through the process as a teacher, you can tell them about the basics – camera positioning, the role of the interviewer and interviewee, use of sound equipment and lighting – and skip to the filming itself. This will keep the young people interested and engaged with the project.
Give the young participants the chance to watch filmed material soon after it’s recorded. Discuss how it can be made even better, and use this to improve the quality of your projects step by step.
Terminology
original sound, voice-over, On and Off, the 5 Ws + 1 H, form of consent, sectional images, characteristics of the camera lens, framing, lapel microphone, directional microphone, asynchronism, rule of axis, shoulder camera, hand-held camera, Golden rule, video light, cutter, shot-counter-shot, clip-on microphone, bridging error