
Introduction
Creating characters, objects and backgrounds is one of the most important steps in preparing your animated film, which is also very fun and creative. Unless you are using the so-called pixelation technique, where you use living people (read more about different stop-motion techniques in the chapter „Introduction to stop-motion“), you will have to make everything you need from different materials. However, the purpose of this chapter is not to rush you into the physical creation process. First, we want to give you general information about planning the creation of your figures, objects and backgrounds and advise you about all the details you need to think about before you start. At this stage it is already extremely important that you have developed a story, created a character profile and drawn a good storyboard so that you can plan your characters and backgrounds in detail. If you have not yet read the chapter on storytelling, you should do so first in order to follow this chapter.
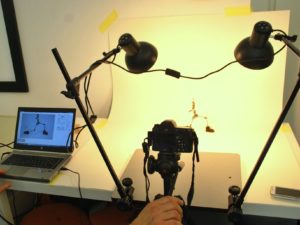
AnimaVision in action |
|
|
|
||
Equipment and tools
This chapter is still a part of the preparation phase of your film. Your idea is mostly still developed ‘on paper’ but is at the same time getting much more detailed in order to support your character, objects and background creation in the way that creates a solid basis for a good animation. Therefore you will need some pencils, crayons, paper, board or a tablet or computer in order to define your characters, objects and backgrounds and make them visible or share them with other participants of your film production.
Main part
When making an animated film, an important part of the preparation is a well defined story with well defined characters, objects and backgrounds and overall style or mood of the film. As a next step, a good storyboard has to be written or drawn to give us detailed information about the number and type of shots we will have.
Visible Storyboard
When creating characters, objects and backgrounds, it is good to have your storyboard somewhere near where you can always check on what you will need. You should also make a written list of all characters, objects and backgrounds you need with a general idea of sizes or even dimensions set out exactly in centimetres and with moving parts of the characters and objects defined.

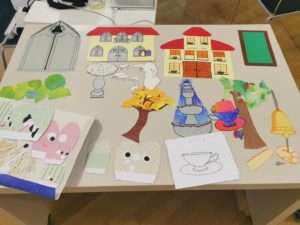
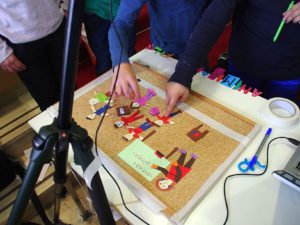
During stop motion workshops you can make a storyboard visible for everyone by drawing or writing every shot on a separate piece of paper and hanging it on the wall or on the board as you can see on the first picture. In the second picture you see characters, objects and backgrounds that were made in advance with different movable features and in different sizes.
Of course, you can also work in a digital environment. Sharing your storyboard using online tools can help you and your group work together even if you are not in the same place or working at the same time.
General guidelines on creating characters, objects and backgrounds
When making more complex stop motion animation you will often face scenes divided into more shots that take place in the same location and at the same time. These shots will vary from wide to narrow ones (please read more about framing for film in the Camera basic chapter in the Vision part of this handbook). Different sizes of the shots will require some extra work in building your characters, objects and backgrounds in different sizes.
At this point we recomend you to go to the chapter about the camera in animation and take a quick look. As you will see in the chapter about camera in animation, the lenses of cameras and the tripods or down shooters can be limited in the size of the picture area that they can cover. That is one reason why you might have to make characters, objects and backgrounds in different sizes based on the wideness of the shots you want to make. If your characters are made in small sizes to look appropriate in wide shots, you are often unable to zoom in enough to get a narrow shot of their faces or some other details of their body parts.
The second reason is that for the wide shots your characters usually have less movable features and your backgrounds are more versatile. And for the narrow shots the features of characters should be much more developed and the background can be very uniform (just one colour even) because viewer sees just a part of it.
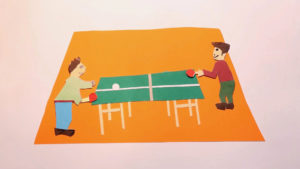

The background, the table tennis table, the rackets and the ball were created in two different sizes in this case to allow for a wide-angle and a close-up shot. This is partly because we were unable to get close enough to the scene with our lens for the wide-angle shot to take the near shot as well.
We recommend that you test your animation setup, including the camera you want to use for your film, or even make a test setting before you start creating. To do this, please follow the instructions in the camera chapter. This will help you to create all the necessary elements even more precisely.
General character creation
When you develop a story, always pay special attention to your characters. They are your stars who drive the story forward. There may be one or many main characters, and in addition to the main characters, other supporting characters, who play less important roles but are important for understanding the story or the setting, may appear.
Even while developing the story, the character profiles and the general style of the film, you should give a lot of thought about what you want your characters to look like. You should define their physical appearance (height, hair, body type, clothes…) and also their personality and mood, which is reflected in their physical appearance.
Characters that play a main role in your stop motion film are mainly made in the way that they are able to move and have one or more different movable body parts (arms, legs, fingers, mouth, eyes..).
The most complex made character is usually the main character or the main characters if there are more of them that play an important role. Background characters can be made with less movable parts.
It is also good for the main character or characters to have some exposed characteristic that the spectator can immediately distinguish them from other characters.
Characters can have moving
- Head
- Arms (also in different joints) and sometimes also fingers
- Legs (also in different joints)
- Eyes and eyebrows
- Mouth
- ….
The fictional character in the first picture is made in cut-out technique and has various movable features, he can move his eyes (eyeballs), eyebrows, mouth, arm and a stick. We had to make all the movable parts separately. All these parts are connected to his body with removable glue pads (see more about connecting body parts with glue pads in the chapter Creating characters in 2D). The character in the second picture is made of plasticine. Plasticine by itself as a material already allows you to do a lot of different movements. You only have to create additional forms like eyes and mouth mostly when animating the face expressions.
The characters can move one of their parts at a time or they can move more of their parts simultaneously. The second option makes them visually much more natural and alive since all living beings move more of their features at the same time when performing different movements. Think about a simple action like drinking coffee. When drinking coffee a person usually moves their hands, lips and at the same time. They don’t perform each action separately.
Video: Moving more features at the same time (from Kotikapne, LIJAmedia – SI). As you can see in the video the character is moving his lips, eyes, eyebrows and a hand with a stick at the same time. This way the movement appears more natural and humanlike in comparison to moving one feature at a time.
Creating characters for narrow and wide shots
If you have a complex film and figures in different sizes, which is often necessary for various reasons we have already mentioned above, the figures used in close-ups may require much more detail and moving parts than figures used in more wide-angle shots.
Characters for wide shots can have less facial details, but (depending on a shot, whether they are moving or standing still) they may need some movable arms or legs. The characters in narrow shots usually require movable eyes (eyeballs and eyelids), movable mouth or even some other changeable detail.
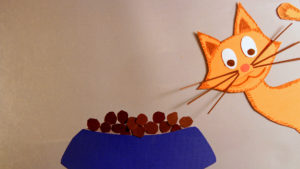
The orange cat is made in two sizes. The cat in the narrow shot is made bigger and has movable eyes and mouth when the cat in the wide shot doesn’t. The cat created for the wide shot was too small in order to make it with movable eyes and mouth but is just the right size for the wide shot.
If you create the same figures in different sizes for different shots, you must also pay attention to the size ratios. The ratio between the figures in the different shots should be the same no matter if you create all the figures in small versions for wide-angle shots or in larger versions for close-up.
Many film scenarios also require detailed shots of body parts. They are usually created completely separately from whole bodies or faces of our characters.
The hands in picture one and in picture two were created completely separately from the whole character in order to be able to animate the shot.
Visual continuity of characters
When creating our character in different sizes you also have to think about the visual continuity. That means that characters created for different shots should look the same even if simplified. You should use the same materials, coloures, and create them in similar shapes in small, medium or big versions. This is especially important if there are more people creating a single character in different versions. It can happen quite fast that characters in different sizes don’t look like the same person anymore. Therefore, it is good to start by creating prototypes with certain sizes and materials for different shots or to assign only one person to create all the figures.
Different types of characters
As we mentioned a couple of times in this handbook, stop motion animation is a wonderful technique that gives you a lot of possibilities to animate not only human figures or animals, but also ordinary objects or imaginative figures. Something that in real life is just a part of inanimate nature or even doesn’t exist can instantly become alive and dance and jump around, talk, sing, get angry or fall in love.
When using objects or imaginative forms as your main characters you can just move them around as they are or personify them with giving them human or animal features like legs, arms, tails, eyes, ears, wings…
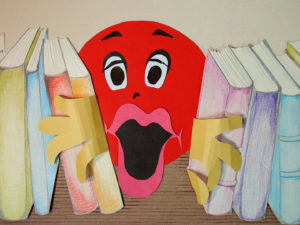
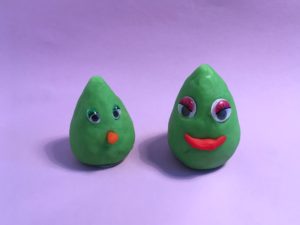
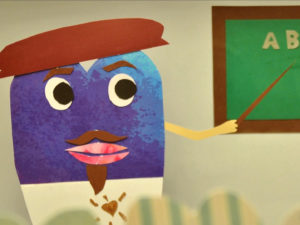
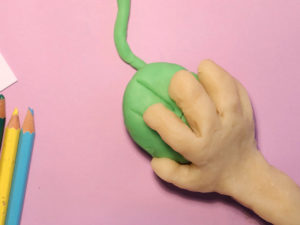
In the first picture the main character is a red ball that can move its hands and eyelids. In the second picture the main characters are made from plasticine in an imaginative forms and are able to move around and move their lips.
It is only up to your imagination and time and production circumstances to decide how your main characters will look like.
General preparation of objects
Objects (that are not functioning as characters but mainly as objects) can play an important role in your film. They can be used as accessories of the main character or other characters, or can be part of the background (but not attached to it). They can be non movable or simple with only one or two movable features, but could be made more complex if necessary.
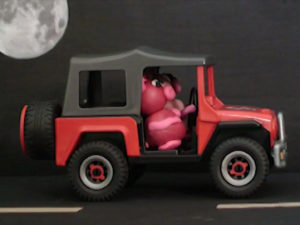
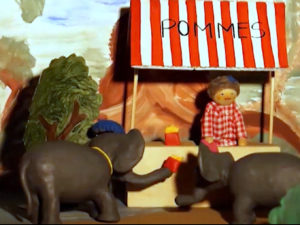
In the first picture there is a car as an object that is moving through the frame, you can move it the way it is or improve the movement by animating the movement of the wheels as well. In the second picture you can see an accessory – the bag of french fries – that main characters the elephants can hold and move around.
There are many ways in which objects can move or have movable features, and they depend on the story and general style of your film, as well as on the decision of how detailed you want the animation to be. Objects can move by themselves, as shown above, e.g. a car, a bicycle, a ship, or a character can move them. You can also have objects that can move, such as a tree with moving branches, clouds in the sky, water that moves….
If you have many objects or your objects have more movable features, you can have only one part of the object or one object moving at a time in your shot or the shot can be more complex with a lot of movement.
Using different objects and moving them around can help you explain the story better and make it more visually appealing and vivid. They can also help establish the scene so that the viewer gets a good overview of the setting before the actual action begins. Depending on the complexity of the shot, this may require at least 12 frames (you can read more about timing in the chapter on animation). Even if the shot is still and shows, for example, a mountain view or a house in the distance, small movements give the viewer the feeling of liveliness that they would not get if the shot was completely motionless.
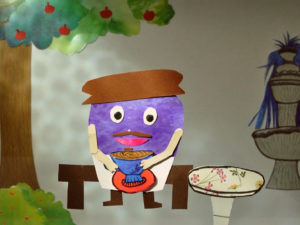
In the first picture two leaves are falling from the tree and are the only movable parts in the scene. In the second picture there are more objects that are part of the scene and can move or have movable features. One of the apples and the cup of tea that the character is holding in his hands are not attached to the background and are able to fall. The water is subtly moving in the fountain. The leaves falling and the water moving in the fountain give the spectator enough time to perceive all the details in the shot, before some real action happens.
Video: Setting the scene (from Kotikapne, LIJAmedia-SI). Example of the establishing the shot with the leaves falling from the tree described above.
Continuity of objects
Also with objects you have to be mindful of the continuity. If the same object appears in more shots of different sizes, the same object should be created with the use of the the same or similar materials, coloures, and shapes with more or less movable features. (You can also read more about continuity of movement and props in the Vision chapter Film structure).
We will explain more about physical creation of characters and objects for the different techniques in next chapters.
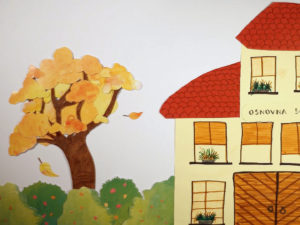
General preparation of backgrounds
Background is usually a part of your stop motion scene that is fixed and not movable, background can be a space, sky, nature, city, room, some imaginable place but also just a blank space, whatever you need to explain the location of your film.
When animating you usually fix it in one position and have to be very careful not to move it even a bit in order to give stability to your stop motion animation. It is very important to fix the background in a place where it is not visible in the picture.

In the first picture you can see that the animators attached the paper background on the edges of the table with the gaffa tape, on the second picture there was a cork board used as the background and fixed with the white tape to the table so it didn’t move while animating. Your background can as well be an infinity paper that is fixed on the wall as you can see in picture three.
If your film is taking place in more locations, you have to create backgrounds for all of them. Preparing the list of backgrounds that you will need and in sizes that you will need will also be a part of your preparation process.
Backgrounds also sometimes have to be made in different sizes for filming a scene that is divided in more shots. The opposite to creating characters that are more detailed for narrow shots and more simple for wide shots, the backgrounds can be more simple for narrow shots and more versatile for wide shots.
As an example we can once again take the animation with the orange cat. In the first shot that is wide, the background is very versatile, while in the narrow shot, that takes place in the same location at the same time with the same characters, the background is simplified. We took just one colour from the background, colour gray. In contrast, the cat in the wide shot is simplified, while the cat in the close-up has more detailed and agile features.
Visual continuity of backgrounds
When you create your backgrounds in different sizes, you also need to think about the visual continuity, similar to figures and objects. This means that you should use the same materials and colours and make them similar in the small, medium or large version, but you can simplify them a bit, as described in the example above, where we used only one colour from the versatile background of the wide-angle shot for the close-up.
We will explain more about physical creation of backgrounds for the different techniques in next chapters.
Common mistakes
As this chapter is still a part of the preparation phase of your film there is basically only one main mistake you should avoid. And this is not defining all what you need for making your animation well enough and/or not sharing it with your crew clearly enough.
Exercises
It is always a good way of learning when already working directly on some project. But as an exercise you can as well take a simple action like drinking coffee at the coffee shop, and try to divide it into two or more shots and think, write down or even sketch all the elements that you would need to create to animate it.
Will you need more characters and different sizes of each character? What movable feature should the characters have (also in different sizes)? Will you need to create some bodyparts separately? What are the objects that you will need to create? Only a coffee cup or some other objects as well? How will the background look like in a wide shot and in a narrow shot? Can you use the same background or two different?
Related topics and links to external resources
Chapters: Camera basics, Film structure, Storytelling
Methodology
If you are working in a group, it is helpful at this stage of film planning to have a clear visualisation of your storyboard, whether it is written or drawn, physical or digital. Then go through it shot by shot, defining and noting all the elements you need to create for each shot (characters, objects and backgrounds).
Terminology
Framing for film, character, object, background, continuity, establishing the shot