
Introduction
In this chapter you will learn how to film different kinds of stage performance and sports event.
By ’stage performance‘ we mean any event or activity that happens mainly on a stage, from a theatre play to a lecture. ‚Sports events‘ include things like basketball games and football matches.
You have to be very well organised to film a stage performance or a sports game. You’ll also need good technical knowledge and experience. But these kinds of projects are also a great opportunity to develop your filming skills.
| |
Vision in action |
|
|
||
Equipment and tools
Filming a live event properly requires quite a lot of different types of equipment, including:
- at least two cameras on tripods. In addition you could use cameras on dollies, or handheld/shoulder cameras
- additional lighting to complement available light, if necessary
- additional sound-recording devices
- additional ambient microphones, if necessary
- enough cables to connect cameras to mixing desks or additional sound devices
- adapters for connecting different audio plugs, for example an XLR or phone connector
- enough batteries for all devices, battery chargers and/or power supply units
- enough memory for all equipment and back-up devices such as laptops with card readers and internal/external hard drive
- mats for covering cables and preventing people from tripping over them
- tape for sticking the mats and cables to the floor and fixing anything else as necessary
- for editing: a computer with editing software with several video/audio tracks and, ideally, a multi-camera feature. Programs like Adobe Premiere Pro offer this, and it makes editing much easier.
Main section
Filming a sports event or stage performance is different from other kinds of filming project in several ways.
Unlike films based on a script, you can’t go back and shoot a scene again if there’s a shot you don’t like or you missed something. You’re shooting a one-off event live, so you only get one chance to get it right.
You also don’t have much opportunity to review your work during the event and address errors or show someone inexperienced how to do something better.
That’s why you need good technical skills. This includes knowledge of the equipment – cameras, sound-recording devices, lighting – as well as experience of directing, filming and editing.
Soft skills like good focus, team-work and the ability to deal with unexpected situations are also really important when you’re documenting live events.
What are you trying to achieve?
Good preparation is the key to documenting any kind of stage performance or sports event. This includes having a clear idea of the result you want.
You will normally be making the film on behalf of the event organisers, so talk to them and to the event participants well before the event. This will give you a good idea of what they imagine the final result will look like and how it will be used.
Find out the following:
- What do your clients want: uncut footage of the whole event, highlights only, material for an image video or a news broadcast, and so on. This will help you decide what you need to shoot.
- What images, if any, do you need to film before or after the event – for example, lecturer entering the building, close-ups of items that can’t be filmed during the event, and so on.
- How do the event organisers want to receive the material: on DVD (one or several copies) with/without printed cover and disk, on a hard-disk, as a YouTube or cloud upload? Video supplied on DVD needs to have a 720×576 px resolution, while video platforms support up to 3840×2160 px (4k) resolution.
- What additional information or material need to be added to the film or live broadcast: titles, credits, PowerPoint lecture slides, flags, score boards, archive film footage, and so on.
This chapter doesn’t discuss live broadcasts in detail. You’re unlikely to be involved with this kind of project since the technical requirements are really high and you’d need to deal with live camera direction and transmission technology. But don’t worry – much of what you’ll learn about filming a stage performance also applies to broadcasting live.
Typical workflow for filming a stage performance or sports event
- Find a stage or sports event you want to film.
- Find out as much as possible about it, including logistics:
- how to get to the venue (public transport, car); available parking
- the people that the film will focus on, and correct spelling of their names
- a plan of the venue, and access to power plugs, light controls and mixing desk
- contact at the venue who is responsible for technical issues
- the event’s running order, including a timeline with indication of when slides or videoclips will be played
- exact position of people on the stage, props, lighting, location of cameras and camera operators
- Do the organisers have permission to film the people on the stage and the audience? How will they announce that the event is filmed? This should be done before the event starts – for example on the ticket or as an announcement before things get underway.
- Decide on individual responsibilities within your team:
- main organiser: responsible for organising the whole shoot and calculating costs; the team’s main contact liaising with the client/event organisers.
- director: on the day of the event, checks everything is working according to plan, including making sure camera positions are correct, the event is documented properly, additional material is recorded, and so on; can be the same as the main organiser
- camera operators: responsible for setting up the cameras and filming the event; may also help to set up other equipment such as lighting
- helpers with additional sound recording: people who know how to connect cameras or additional sound-recording devices to mixing desks, and how and where to place additional microphones; may not be needed on every project
- best boy (male or female): helps the main organiser and provides technical support to the camera operators; can also be responsible for things like refreshments for the crew
- standby team members: replacing other members of the crew who can’t attend on the day, for example because of illness. You should record all relevant information about the event clearly, so that even the main organiser and director can be replaced if necessary. For events lasting over two hours you’ll need standby team members to relieve camera operators so they can have a break from time to time.
- Make a list of everything you need to do and tick tasks off when you’ve completed them.
- Ask for a plan of the venue or draw one yourself. This will help you work out where to place the camera(s) and any cables linking to to external microphones or a mixing desk. If possible, visit the venue before the day of the event to get a good idea of how things will work. Mark the floor position of each camera with tape and make sure there is enough space around it for the camera operator. You can mark this space with tape on the floor too or isolate it with barrier tape.
- Decide what each camera will capture. At least one camera shout be set up to give you a picture with wide- or middle-total framing. If you’re filming a lecture or another stage event, decide if the audience should also be filmed from the back, using wide- or middle-total framing. If you only have two cameras, focus both on the stage, and use narrow-total framing for the second camera. If you have more than two cameras, one could film the audience from the back with wide- or middle-total framing, while another could use narrow-total framing to show the stage without the audience or a specific area in the room where things are going to happen. Additional cameras could film American, waist, chest, portrait, and close-up/detail shots. The types and features of each camera – weight, lens, light sensitivity – will help you decide which one should be used for what. Here are some examples of what your cameras might capture at different events:
- lecture: narrow total of lecturer (camera 1), waist shot of lecturer (camera 2), audience (wide total)
- sports game: wide total of the pitch/court (camera 1), middle total of several players together, with the one holding the ball in the middle (camera 2), narrow total of the player with the ball (camera 3)
In both cases some of the cameras may be stationary on tripods while others are handheld, attached to a dolly, or otherwise moveable.
Always have a ‚plan B‘ in mind in case things don’t work as planned. Problems can include not being able to place a camera where you wanted to and a device failing completely.
- Remind yourself of key rules:
- Use the rule of thirds when you’re filming a single object or person.
- Don’t cross the axis of action. For a stage event this is the edge of the stage, and for a sports game it’s the line running the length of the pitch or court across the middle. The angle between any two cameras should be at least 35°.(See Film structure for more detail on the axis of action.)
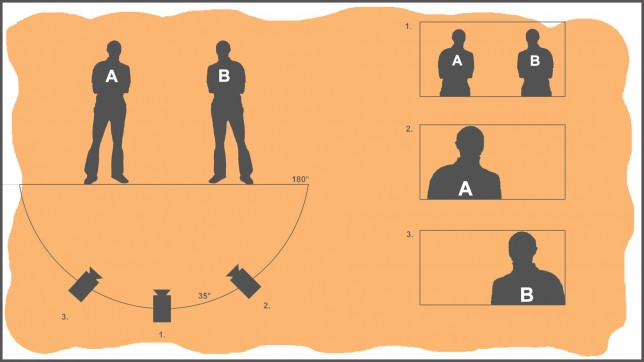
Axis of action: stage performance
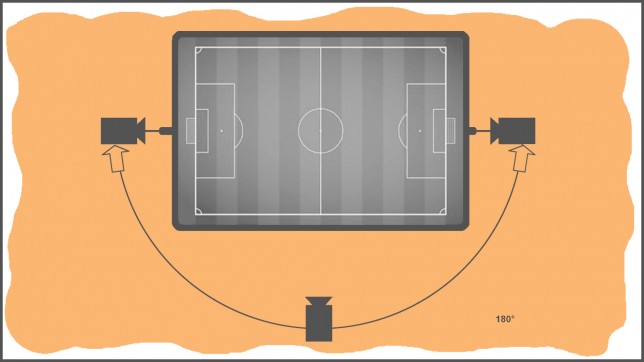


Axis of action: sports event
- Position the cameras so that they are not accidentally captured in any of your image material. For handheld cameras or cameras on dollies, agree with the camera operator which way they can move so they can avoid being filmed.
You’ll sometimes need to film close-up and detail shots. This is where you’ll have to compromise between getting the material you need and the risk of a camera operator being caught on one of the other cameras. After all, you might have to go on stage or walk among the audience.
You could also end up blocking someone’s view. If that happens, don’t worry. Most members of the audience will understand that you’re just doing your job and not trying to annoy them deliberately!
- Choose the right format for recording, depending on the end product your clients have asked for (DVD, web upload, and so on) and the types of camera you’re using. camera types. If one of your cameras can only film in standard definition (SD), you can either set all cameras to film in SD or alternatively have some blurry footage when you enlarge SD to high definition (HD) at the editing stage.
- Choose the right camera settings for the conditions: automatic or manual focus, automatic or manual brightness, image stabilisation on (handheld camera) or off (camera on tripod).
- If you’re using manual settings, set the white balance indiviually for each camera in the spot where it will be filming.
- Decide on how sound should be recorded. Are the cameras‘ built-in microphones enough? Do you need to place additional microphones closer to sources of sound?
- lecture: record what the speaker is saying using a built-in camera or lapel microphone. Alternatively, connect an additional recording device to the venue’s mixing desk to get a direct feed from the microphone which will be provided on the speaker’s desk or lectern. Record ambient sound and any audience questions through built-in camera or ambient microphones. To make sure you capture clearly what they say, you could give members of the audience wireless microphones or other record devices.
- sports event: built-in camera microphones should be sufficient to capture sound from the game. You can use additional devices to record a sports commentator in their booth.
- Meet with the whole team at least once before the event. Discuss the details and address any questions.
- Make a list of all the necessary equipment and pack it.
- Be at the venue at least two hours before the event starts. Depending on the the event, you might want to get there six to eight hours earlier, or even set up the day before. Try to avoid traffic jams and driving around trying to find a parking spot. Allow time for filming additional material that you can’t capture at the event, for example close-ups of trophies, participants arriving, posters, and other relevant detail. This can really help to make your film or broadcast more than just event documentation. Any additional material like that can also be used for sectional images, to create nice cuts between shots and cover up imperfections in the footage like shakes and blurriness.
- Check the available light and find out how you can adjust it. You may need help from technical staff at the venue.
- Set up the cameras, additional sound devices and lighting as you planned, but be flexible. You may have to make changes if the conditions aren’t quite as you expected. Once you’ve done that, check:
- camera and tripods are working properly; their position and settings, including camera recording formats, automatic/manual functions, image stabilisation on/off; if you have enough full batteries for each camera.
- you have enough memory (tapes or memory cards) for each camera, and a suitable pen – remember to write on each memory device (or its case) which camera it was used in and what is recorded on it.
- additional microphones and recording devices are working properly; their position and settings, including recording formats.
- additional lights are working properly.
- everybody knows what they’re doing, in particular whom or what they’re filming.
- everybody has enough drink and, for longer events, food.
- Switch off all phones or select flight mode after you’ve set up. Start recording a few minutes before the event begins. If you think that one or more cameras will need new memory at some point during the event, start each camera five minutes after the previous one. That way you won’t have to change the memory card or tape on all cameras at the same time, and there will always be a camera recording.
- When all cameras are ‚rolling‘, the director should check all devices are recording properly. Nominate someone to stand in a spot filmed by all cameras and clap their hands (or use a clapperboard); this will help you synchronise the material coming from different cameras. If an event is interrupted by breaks, repeat the exercise before you start shooting again.
- Stay focused and silent – this applies to all camera operators. They should also check with each other before zooming, to avoid all cameras recording a zooming shot at the same time – you probably won’t be using this in the final cut. Nevertheless, camera operators should make sure they perform the zoom well, just in case it needs to be used (for example if several cameras were zooming at the same time by mistake).
- Plan what image material should be filmed after the event, for example close-ups of brainstorming drawings generated during a talk.
- Continue recording for a few minutes after the event ends. You might use some of the material in the film.
- Have a break after you stop filming, but remember that you might still have work to do. You’ll want to record the additional material you planned to get, and you could even arrange to film pre-event scenes you didn’t catch, for example a lecturer entering.
- Collect all memory cards and tapes, and make sure they are properly annotated. Start to pack up, using your equipment list to make sure you have everything.
- The director might have another discussion with the event organisers/ people in the film about the result they’re hoping for. The director should also make sure all necessary filming permissions – the right to publish images of the participants and the venue – are in place.
- Before you continue with editing take some time to enjoy yourself. Then make the most of the (hopefully successful and not too stressful) shooting.
Editing your material
Now that you’ve filmed a stage or sports event, it’s time to edit your material.
You can do this using any film-editing software that allows you do add multiple video and audio tracks. Programs you might use include Adobe Premiere Elements, Adobe Premiere Pro and Lightworks (Freeware).
Here are the steps of the editing process.
- Copy the files from all your memory cards/tapes onto a single storage device like a hard disk (internal or external). Make sure everything is copied across: check you have the same number of files and volume of material on the hard disk as you do on all the memory cards. You can see the overall file size in Windows by right-clicking on a folder and selecting ‚Properties‘. The material recorded on tapes will need to be saved onto the new storage device by connecting the camera or another tape-player to a computer. When you copy or save any material, make sure the files are sorted into appropriate folders (for example ‚camera 1‘, ‚camera 2‘, ‚camera 3‘, and so on) and suitably named (for example ‚part 1‘, ‚part 2‘, and so on).
Adobe Premiere Elements and Adobe Premiere Pro users: to keep the same folder structure in the Adobe Premiere project window as you have on your single storage device, make sure you only use main folders and don’t create any subfolders on your single storage device before the import into Adobe Premiere. If you have subfolders, the program will put all the files in those subfolders (the folder structure on the storage medium will stay as it was). It’s better to keep all folders at the same hierarchy level (main folder) and name them as “camera no. 1 – video” and “camera no. 1 – audio”, rather than creating a ‚camera no. 1‘ main folder with ‚video‘ and ‚audio‘ subfolders.
- Import all files into your editing program, then inspect them to get an idea of quality and to check all the material is there. Discuss with your team which parts of the material are good and which could be better.
- Synchronise all the video and sound recordings using multiple video and audio tracks. Sort the video tracks from narrow to wide framing – that is, starting with details and close-ups at the top and ending with the widest shot at the bottom. Find the clap of hands or clapperboard in the footage taken by the different cameras and sound devices. Now ’stack‘ the video and audio tracks on top of each other in the timeline window, and align them so that the clap can be seen/heard at the same time on all of them (see Film editing).
- If possible, synchronise all tracks using their sound. This is the most precise way of synchronising. It helps you avoid misaligning the tracks, which can create a reverb effect when you play all the tracks simultaneously (see Film editing). You won’t always be able to use sound for synchronisation, of course. For example, if you’ve been filming in a big sports hall where there’s a lot of noise and sound delay, the sound quality will be too poor for synchronisation.
- With all tracks synchronised, choose the best clips (in terms of angle, framing and so on) for each part or moment of the event. You will need to delete sections from higher-placed tracks if you want to use a clip from a lower track. The exception is the bottom video track (normally total framing), which doesn’t need to be cut as it’s either visible or hidden by the tracks above it.
Adobe Premiere Pro users: After tracks are synchronised, you can use the multi-camera function to cut them. This is essentially a tool for directing several cameras during an event, but you can replay material as often as you want, and you can still cut manually.
The multi-camera tool allows you to watch all video tracks at the same time in a preview window. In the process you can make a rough selection of the shots you want in the final cut. You can do a more careful edit afterwards, including extending or shortening a selected chunk of video in the relevant track.
- Once you’ve edited your video, you can shorten the final cut if it’s a bit too long (for example if the film is to be published on DVD), add titles and credits, and focus on post-production. This includes adjusting the colours of material from different cameras if necessary, and adjusting the sound from different audio tracks.
Exercises
- Find the floor plans of performance and sports venues online. Discuss where you would place the cameras, what they could film, what sound you might record and how. As with a storyboard, think about the framing each camera would use.
- Do a dry run: pick a venue you have access to, for example a youth club, and set up a shoot according to the workflow above as if you were really filming an event there.
- Do it for real! There’s not better practice than actually filming a real event. Start small – for example a school choir concert, theatre performance or sports game – then move onto larger events when you feel ready.
Common mistakes
- Not reserving the space necessary for camera operators in advance. You might find that there is plenty of space when you first visit the venue, but on the day there are chairs for the audience where you wanted the camera operator to be. This can lead to problems with setting up the tripod and camera, and with moving around the tripod during the shoot.
- Cameras not set up properly – including recording formats, automatic/manual functions, image stabilisation on/off – before shooting starts.
- Using your camera’s automatic brightness function in changing light conditions. If the lights are suddenly switched off to allow the audience to see a projected image during a lecture, the automatic brightness function would provide good contrast for the picture on the screen, but everything else will be too dark. Make sure you know how to set the aperture and light sensitivity of your camera manually.
- Relying on zooming for close-ups and detail shots instead of moving around on the stage. Zooming can result in a shaky picture and distorted camera angles.
Related topics and links to external sources
Chapters: Camera basics / Camera advanced / Film structure / Sound, music and sound effects / Film editing with editing software / Encoding files for archive, online upload and video discs
Methodology
As viewers, we usually expect high production quality when we watch a filmed sports event, concert or another stage performance. But in the context of helping young people develop their film-making skills, it’s good to be realistic and to allow for mistakes.
This doesn’t need to be a problem. Simply communicate to the organisers of the event you’ll be filming, and to the participants, that your group is still learning and there is likely to be a lot of room for improvement in the final product.
At the same time you can make sure that the quality of what you produce is as good as it can be by helping the young people familiarise themselves with the workflow and learn the skills they’ll need. This includes being able to use the equipment well and familiarity with basic filming rules.
Practising setting up all the equipment a few times can also really help with setting up on the day of the event.
It mind sound old-fashioned, but repetition is one of the best ways of memorising how to do things, especially when it comes to physical actions.
Another way to ensure quality in future is to analyse any projects you do as a whole: the outcome you wanted to achieve, the working process, team work, unexpected issues, mistakes, and the quality of the material.
It can be hard for young people who are learning a new skill to receive negative feedback. But this is part of the learning process itself – as long as the feedback is useful, constructive and doesn’t apportion blame.
Terminology
stage performance, sports event, venue, multi-camera feature synchronnisation