
Introduction
You’re film is finished? Great!
Now what?
Well, there are still a few things you should learn to do to make sure you can always access your work without problems and share it with anyone you want to.
This chapter is about archiving your project. We’ll also show you how to encode it in various format so you can upload it online, play it on smartphones, tablets and other mobile devices, and publish it in any other way you want.
And you’ll learn how to burn video discs like DVDs and Blu-ray correctly using Adobe Premiere Elements and similar programs.
| |
Vision in action |
|
|
||
Equipment and tools
- To encode your video files, you’ll need a computer. Most of the encoding can happen in the program you used to edit the film, but you could also use specialist video-encoding software. You can buy this or find a free program online.
- The other things to get are a disc-writer (for example external or internal DVD or Blu-ray writer), and empty writable discs.
- You’ll also need software that lets you burn discs in a way that makes them readable for DVD and Blu-ray players. You can burn discs without specialist software directly from Windows Explorer or Media Player, but the discs will simply serve as storage for your files and will not be readable by DVD and Blu-ray players.
Main section
The original video files that your camera records often take up a lot more disk space than your finished, edited film.
It’s unlikely that you’ll need all the material you filmed. You might want to keep a few shots if you think they will be useful in future projects. You can free up a lot of disk space by deleting the rest a few months after the film is completed and published.
Archiving your film
When your film is finished, you’ll need to export it from the editing software into a single file. The type of file will depend on what you want to do with the film – for example publish it on an online video platform, play it on a smartphone or store it on a data or video DVD.
Exporting involves combining all the video and audio tracks in your project – including all of their various video and audio clips – into a file with just one video and one audio track.
It’s really important also to store the film in the best possible resolution and frame rate. This will usually be the resolution and frame rate at which it was shot. If the video was shot in Full HD (1920 x 1080) at 25 frames per second, encode it in Full HD resolution, with 25 frames per second.
A video’s resolution tells you how good the quality of the picture is. It’s expressed in pixels – for example, Full HD translates as 1920×1080 pixels.
Before you start shooting, select the highest resolution your camera offers. The higher the resolution, the more detail the picture will have and better the video quality will be.
If you’re using several different cameras, select the same resolution on all of them. Alternatively, you can set each camera to film at the highest resolution it’s capable of. The material filmed on cameras with lower resolution will look blurry when it’s ’stretched‘ to a higher resolution at the editing stage.
Remember that higher resolution usually means a larger file size. Larger files will take up more space on memory cards while you’re filming, and on any permanent storage device later on.
The frame rate tells you how many frames your camera records per second. The minimum for a smooth picture is 24 frames per second (see below). The higher the number of frames per second, the smoother the video, especially if you want to use some of the footage in slow motion.
You might notice the letter ‚i‘ and the letter ‚p‘ after the numbers in your resolution options: for example 1080i and 1080p. Always select the ‚p‘ option when you set the resolution of your cameras.
A quick explanation for advanced learners: There are two types of frame rates – interlaced and progressive. Interlaced frames were originally developed for TV to reduce flickering when the picture was transmitted over a low bandwidth. They create moving images by splitting the picture into fine horizontal lines. Only half of those lines appear in each frame, and odd- and even-numbered lines alternate. The typical rate is 60 interlaced frames per second (60i). By contrast, a progressive frame carries the entire image. A frame rate of at least 24 progressive frames per second (24p) is necessary to make our brain see individual frames as a moving image.
Modern television sets, projectors, computers and mobile devices don’t support interlaced frames. That’s why we recommend that you only use progressive frames.
Technology develops very quickly. Some storage devices can become obsolete while others aren’t reliable in the long term – for example, DVDs are easily damaged.
That’s why it’s a good idea to store your film, in its original resolution, using at least two or three different devices, such as:
- hard disc
- online cloud storage
- data disc, for example data DVD or data Blu-ray.
Saving your film on a video disc will reduce its resolution – for example to 720 x 576 px on a video DVD.
Encoding for online video platforms, social-networking sites and mobile devices
So that people can watch your video at the best possible quality, upload it on social-networking sites and online video platforms sites like YouTube and Vimeo. Many of them support video resolutions of up to 4k, which is very high.
You could just upload your video at its highest resolution – basically uncompressed – but that could take quite a long time.
It’s better to encode the video so that it matches the format of your chosen platform. Many film-editing and specialist encoding programs have the resolution presets of popular platforms and websites, to help you encode videos more easily.
If your own internet connection is very slow, you could speed up the uploading process by encoding your video at a lower resolution. But don’t worry about the viewer if your video is in high resolution: social-networking sites and video platforms will offer several different versions of your video, all at different resolutions, so that users can choose the right one for their internet connection.
If you want to save or download a video onto a smartphone or tablet, you’ll need to encode it as a highly compressed file format, and perhaps even reduce the resolution. Not all smartphones support FullHD yet, so there’s no point in playing a massive file with a very high resolution – the video will only display at the phone’s own screen resolution.
There are several different video file formats that Apple, Windows and Android phones can all play. H.264, or MPEG-4, is one of the most common, and provides high compression without much loss of quality.
Encoding in Movie Maker
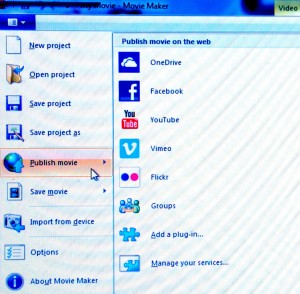
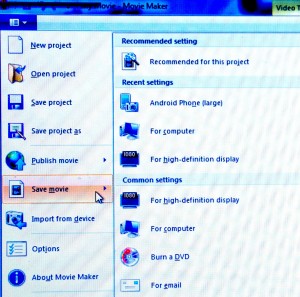
Microsoft’s Movie Maker has many presets for saving your film and publishing online.
Encoding with Adobe Premiere Elements
Adobe Premiere Elements has various presets that allow you to easily encode and upload your file onto platforms and sites like YouTube, Vimeo and Facebook.
There are also several options for storing and playing files on the computer itself. And you can export them to mobile devices like smartphones and tablets.
[screenshot PE – I need to install english version]
To see the various encoding options select ‚Publish and Share‘ (top right). You will then have a choice between ‚Social websites‘ (YouTube, Vimeo, Facebook), ‚Computer‘ and ‚Mobile phones and players‘.
Encoding for online video platforms and social-networking sites
- Select ‚Social Websites‘ and choose one of Facebook, Vimeo, YouTube and so on. Each category offers a several different file formats to choose from. Pick the one that’s closest to the resolution and frame rate of your film project. This will normally be the resolution and frame rate at which the film was shot.
- If you only want to upload part of the material in the project timeline – for example, one song rather than an entire concert – select ‚Export defined area in working space only‘. Define the section for uploading using the grey bars in the timeline. The ‚Publish and Share‘ window will disappear while you do this; just click on ‚Publish and Share‘ again to open the uploading options.
- Once you’ve selected the relevant settings, click ‚Next‘ and you’ll be asked for your YouTube/Vimeo/Facebook login details. Enter them and the video will be uploaded to your account.
Encoding video to be stored and played on a computer
- In the ‚Publish and Share‘ window, select ‚Computer‘, and you’ll see several different video, image (for exporting film stills) and audio (for exporting sound only) file formats. Select a format compatible with the original files in your project. It should also offer the resolution, quality and file size you want for your encoded files.
You’ll be able to change the frame rate, TV standard (PAL in Europe, NTSC in the US and parts of South America), audio settings, file size and length for each file format. If you are an advanced user, you might also decide to change some of the ‚Advanced Settings‘. - As with encoding for online video platforms, use ‚Export defined area in working space only‘ if you don’t want to export the whole project. Define the section you want to use with the grey bars of the timeline.
- Choose a file name and a folder on your computer/storage device where you want to save the file. Then click on ‚Next‘ and Adobe Premiere Elements will start encoding.
- Make yourself a cup of coffee!
Encoding video to be exported to a smartphone or tablet
This works the same way as encoding a file to be stored and played on a computer.
Choose the device you want the video to be exported to – smartphone or tablet, iPhone or Android. Now change the settings as necessary, for example video resolution and frame rate. If the phone or tablet is connected to your computer, save the file directly on the mobile device.
Creating a video disc for DVD and Blu-ray players
There might be an option for creating a DVD, Blu-ray or AVCHD disc in the film-editing program you’ve been using. If not, you’ll need to find additional software. You can do this online and it might even be free.
AVCHD is an HD video file format that allows you to burn video onto a normal DVD using either a DVD or Blu-ray writer. However only Blu-ray players can read DVDs recorded in this way.
There’s an important difference between burning video files onto a disc to store them as data and burning video discs so the video can be played by DVD or Blu-ray players.
Save you files on a data disc to keep the native file formats and quality.
If you’re using Windows, you can burn data discs by simply dragging and dropping your files onto the recorder icon in the Windows Explorer. You can also use Windows Media Player to create data discs.
Creating a video disc with Adobe Premiere Elements
Before you burn a DVD, Blu-ray or AVCHD disc using Premiere Elements, decide if you want to include a menu that allows you to skip to specific scenes in the film. The alternative is a disc with no menu; this means the film will start automatically when you insert the disc into the player.
Burning a disc without menus or directly accessible scenes:
- Select ‚Publish and share‘ (top right), then ‚Disc‘, then ‚No‘, to confirm you want to burn a disc without menus.
- A new window will appear, giving you a choice between different types of discs.
- Skip to point ‚Choose the type of disc‘ below for the next steps.
Burning a disc with menus and directly accessible scenes:
- Select ‚Publish and share‘, then ‚Disc‘, then ‚Yes‘, to confirm you want to burn a disc with menus.
- A new window will appear, giving you a choice between different disc-menu templates sorted in categories (general, entertainment, birthday, and so on). Pick the one you like. Some templates may have to be downloaded first, but the download will start automatically when you make a selection.
- When the menu template has downloaded, you can customise the look and feel of your menus – the main menu and the scene menu. This includes making graphic elements like title fonts, images and buttons look like the titles and other graphic elements in your video.
- In the top-right window you can also assign a background image and audio file to each menu. Your selection will override any image and sound that came with the template. Click on ‚Disc preview‘ to check how your menus will look on the finished disc.
- When you first start editing the scene menu, there will only be one ’scene‘ available – your entire film. To define the starting points of scenes, place the red cursor in the timeline, right-click and select ’set menu mark‘. A new window will pop up and prompt you to give the scene a name; this scene will be visible in the scene menu.
- Repeat for all the scenes you want viewers to access from the scene menu.
- If you want to provide direct access to more scenes than one scene menu allows, you can create several scene menus.
- You can scroll between menus using left and right arrows.
- When you’re done, click ‚Ready‘ on the top right, then select ‚Publish and Share‘ and ‚Disc‘ again.
- If you want to make last-minute changes to menus before you burn the disc, go to Tools->Film Menu in the top menu bar in Premiere Elements.
Choose the type of disc you want to burn (DVD, Blu-Ray, AVCHD) in the ‚Disc‘ window:
Give your disc a name, choose the writer you want to burn the disc with, and set the number of copies (best to burn one copy and check it first before creating more).Insert an empty video disc into your computer or external writer and start burning!
Terminology
resolution, fps; frames per second, encoding, exporting,DVD, Blu-Ray, AVCHD disc, data disc, video disc