In this chapter you’ll learn how to record sound for different types of film. There’s an overview the equipment you can use, as well tips and tricks for dealing with common problems in sound-recording.
Vision in action
Decide what sound you’ll need at the script-writing stage. This can include dialogue, music, ambient sound and special effects. Think about how you will create or source these sounds.
When you record sound, always point the microphone or recording device at the sound source. Alternatively, place it in the middle of several sound sources according to the polar pattern of the microphone.
Always carry earphones with you so you can check the sound quality on the spot.
Learn how to check the sound levels on your camera. You also need to know how to adjust the gain or put it into automatic adjustment mode. Be careful not to exceed the maximum level of 0 dB (analogue devices) or -9 db (digital devices).
Always have fully charged extra batteries with you for the recording device.
Equipment and tools
Basic sound effects and general sound can be recorded on your video-making device (camera, photo camera, mobile phone, etc). For more advanced recording of sound, you will need different types of microphone, audio recording devices and accessories, including a computer and boom pole.
Main section
Although the earliest films had no sound, screenings were accompanied by live music almost from day one. This usually involved a musician playing the piano, violin or guitar, though some cinemas used entire orchestras.
Sound was first recorded in 1927, and since then film-makers have used it in various ways. Some have even claimed that achieving good sound is half the battle when making a film. It’s true that sound is very important in video-making, and you should start thinking about it at the preparation stage of your project.
The role of sound as a means of expression is perhaps most important in feature, animation and documentary movies. However, it’s also key in other types of video, like TV news items, in-depth reports and even simple video collages.
Types of sound
Sound from the camera
All video-recording devices nowadays have a built-in microphone. Sound recorded in this way can be used for general ambience, but it’s not usually suitable for recording dialogues or interviews. The problem is that, if you want to amplify the voice at the editing stage, you are boosting the ambient sound too. This makes dialogues or interviews incomprehensible.
There are several ways to get good sound quality from your camera:
Film in a quiet environment with very few or no other sound sources around you, like traffic or machine noise.
Place the camera as close to the sound source as your framing allows, with maxed zoom-out.
Some cameras have a microphone zoom-in option alongside the lens zoom-in. Look through the menu of your camera for ways of using this function.
Even if you don’t use it in the final edit of your film, the sound from a built-in microphone is still very important. You will use it to synchronise sound from external sound-recording devices and audio tracks from other cameras.
And despite some disadvantages, you might still find that you can record music with reasonable sound quality – for example someone playing an instrument – using your camera’s built-in microphone.
Dialogues and interviews
Videos are a way of conveying information through images, but images are not always enough.
This is where dialogue comes in. It’s a great tool of creative expression, and there are films based entirely on intelligent conversation.
You can show that a person has a headache using only visuals and no words – for example, the person looks tired, they’re holding their head, taking a pill, etc. Or the headache can be explained verbally – the person tells someone how he or she feels. It’s not common to show something using both picture and sound/words in feature films, as this doubles the message unnecessarily.
In short TV news items and in in-depth reports the information is usually doubled – what we hear relates to the picture we see. If a narrator is talking about an event off-camera, we usually see exactly what they are describing. This makes the report more trustworthy.
When you record dialogues and interviews, use an external microphone attached to the camera or another external recording device, rather than your camera’s built-in microphone.
Voice-over
A voice-over is a piece of narration where you can’t see the person talking, you just hear the sound of their voice.
Voice-overs are very common in feature films, documentaries, TV news items and reports. They lead the viewer through the story, explain or comment on situations, share information that might not be included in the picture, and create a particular atmosphere. Voice-over can also be used to share the narrator’s thoughts and opinions.
A voice-over is usually recorded after filming has finished. For feature films the voice-over text is usually prepared at the script-writing stage. For documentaries, news items and reports, the text is usually written at the editing stage, when you have your picture material and the answers from any interviews. That way you can adjust the text to the available information and visuals.
Ambient sound and sound effects
Ambient sound can be recorded on location using your camera. It can also be recorded and added at the editing stage.
It can sometimes help to add sound that might not have been present on location but helps to create the right atmosphere. This could be the sound of wind, waves, birds chirping, creaking, rustling, and even annoying machine sound.
If you’re showing the source of a particular sound in your video, but weren’t able to record the sound well or don’t actually like it, you can add sound effects – for example a door slamming, a doorbell/telephone ringing.
Sounds effects are also used to bring to life unfamiliar settings, for example space (where you can’t actually hear anything), heaven, or a futuristic location. And they can help to stress an action or emotion, for example punches and slaps in action films.
Be creative, and play around with the combination of sound and picture, either to emphasise or contradict the depicted action. Showing a busy street with lots traffic but no sound tells audience how the character might feel – for example detached from their surroundings or preoccupied with a traumatic personal event.
Music
Music can really help you create the right sort of atmosphere in your video, as well as arousing feelings of joy, sadness or anger.
There are several ways of sourcing music for your project. You could invite a ‚composer‘ to create music especially for your film. This could be a friend who plays an instrument or composes music using a computer. They can adapt the music according to your idea of the final result.
You could also use music that already exists. This can be a classical work or folk songs that your school orchestra may be able to perform. You’ll need to confirm that the original sheet music or the specific interpretation of the work that you are using for the recording aren’t copyrighted.
Or you could use music by a band you know that can give you permission. There is also free music on the internet, or, if you have the budget, you may be able to buy the right to use someone’s music at a low price. Find out more in Free internet resources.
Silence
In real life silence is never the absolute absence of sound. Even when it’s really quiet you’ll be able to hear ambient sounds. That’s why sound is never completely muted in films.
Silence draws the viewer’s attention to the picture. It is often used for close-ups, where a person’s facial expression conveys emotions.
Camera and sound recording
Making good recordings of sound, especially dialogue, is a challenging task in low-budget productions.
If you’re using a small video camera or a photo camera with a video-recording function, you probably won’t be able to attach an external microphone to it. The sound captured directly through the camera’s built-in microphone will be poor and full of background noise.
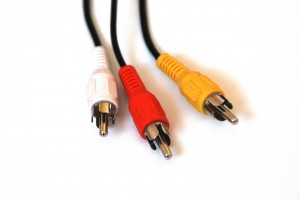
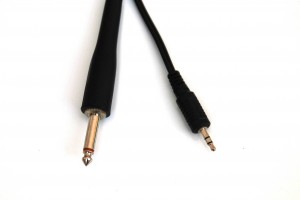
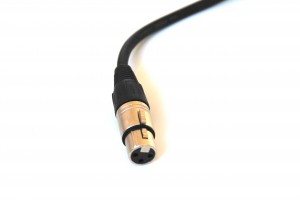
A middle-range video camera will usually have a separate audio input for one microphone; this can be a small jack or a slot on the top of the camera.
Better-quality video cameras usually have two audio inputs; these can be either XLR or small jacks. Each input links to a separate channel. You can choose whether to record a different sound on each microphone/channel – for example, ambient sound on one and an interview on the other – or to capture the same sound through both microphones and record it on a single channel. The first option gives you more flexibility when you manipulate sound in post-production.
Different connectors
RCA or cinch connector (left), jack/small jack (middle), and XLR connector (right)
Adjusting sound levels on your camera
You will probably find different options for adjusting sound in the menu of your camera. Some might be activated by buttons on the camera itself. Read your camera’s manual to find out how best to adjust the sound levels.
Adjusting the recording level
You can adjust the recording level manually. You should be able to see the recording-level scale on your display screen, and monitor it while you record.
For the best result, set the maximum recording level on analogue devices to 0 dB (the red point). On digital devices the limit is -9 dB; this should be the loudest sound you record in a scene.
If you have a scene that ends with a scream, for example, set the sound level to match the volume of the scream. This is useful if you want to maintain a realistic sound level at all times, for example when you’re filming a conversation or a music performance.
The automatic adjustment function usually raises the recording level when the sound is quiet. If the sound suddenly becomes louder – an exclamation during a conversation or a louder song – this may lead to an inappropriately high recording level and distortion while the camera adjusts to the volume of the actual sound.
Sound recorded with a good external microphone (for example shotgun or wireless) will be clear and almost free of ambient noise even if you increase the volume in the final edit.
That’s why it’s better to have a slightly quieter recording that can be adjusted to the necessary sound level at the editing stage. A very loud or distorted recording means an irreversible loss of quality.
When shooting with a camera that can record sound on two channels, you can set the levels for each channel separately. If you’re using two different microphones, set up each one on a separate channel (don’t combine them on the same channel) to give yourself more sound-editing options.
Mic NR is a function for reducing the motor noise from the camera itself. It’s good to turn it on when you’re shooting with a built-in camera microphone. Turn it off when you use an external microphone.
The wind or low-cut function is a filter that aims to remove wind noise. However, if you’re shooting in windy conditions, use a wind muff instead of relying on this filter. The wind muff is a cover made of fuzzy sound-absorbing fabric, often called ‚hamster‘ or ‚dead cat‘.
The Mic att (attenuation) function is only used in extremely loud conditions, for example at a concert. Use it whether you’re recording the sound coming out of the loudspeakers or sound is fed directly into the camera through a cable.
Recording sound with external microphones or recording devices
Using a microphone with a boom pole
This is a very common way of recording sound, especially a dialogue or a scene with several people.
One person in your team should be the designated boom operator. He or she will be responsible for placing the microphone correctly and for the quality of the recorded sound.
The boom pole is a stick made of light material. A microphone is placed on the boom pole which you can then move close to the actors‘ mouths or other sound sources. The boom operator must stand where neither they nor the boom pole, microphone or cable (or their shadows) can be seen in the picture.
A microphone basket with a wind muff is also often used when recording sound.
[PICTURE on the set recording with a boom microphone and boom pole]
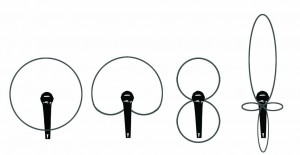
Different microphones have different areas of coverage. This depends on their polar pattern – an indicator that shows how sensitive they are to sounds coming from different directions.
Omnidirectional microphones record sound from all directions. Unidirectional ones – like cardioid, bidirectional and shotgun microphones – record sounds from just one or two directions, using either a wide or a narrow angle. Shotgun microphones are commonly used in film and TV productions.
Some microphones or external sound-recording devices can be set to different polar patterns.
Illustration: omnidirectional, cardioid, bidirectional and shotgun microphone.
Using a hands-free wireless microphone
This sort of microphone is a great tool for recording sound when the speaker is moving. That way you don’t need someone to hold a larger microphone or support a boom pole, and you avoid the risk of accidentally including the microphone or a cable in the picture.
Wireless hands-free microphones are often used in reality TV shows, talk shows, and to record interviews, usually in a studio. They can also be used in documentary films in any location to give interviewees more freedom to move around. This makes the video more dynamic while still achieving excellent sound.
Transmitter, receiver and microphone (left) and receiver attached to the camera
Transmitter and lapel microphone attached to a person
Using a hand-held microphone
This is the most common way of recording interviews for a news report. It is also used in some documentary films.
You can either include the microphone in the picture or leave it out. If you don’t want the microphone to be visible, narrow your framing.
Wired hand-held microphones are connected to your camera via a cable that can create a crackling sound when it moves. To avoid this, untangle the cable and hold one loop with the hand that holds the microphone.
[picture of ME 66 hold by a person]
Using a handy portable recorder
This is a great way of recording sound if you can’t attach an external microphone to your camera. It’s also useful when you’re using a photo camera, recording a live music performance, or recording sound for a stop-trick animation.
There are several brands of affordable handy portable recorders. You should also buy a tripod so you can place the recorder in an appropriate position during the shoot. You can also attach the recorder to a boom pole.
You’ll need to do a bit more work during the editing stage to synchronize the sound from a portable recorder with the picture from the camera. In the end, though, you’ll get a much better sound quality than that from a built-in camera microphone.
Always point the microphone in the direction of the sound source, for example a person’s mouth. If there are several sound sources, for example loudspeakers at a concert, place the microphone/recorder in the middle and at an equal distance from all sources. Find out more in Filming and editing a concert or stage performance.
What if you don’t have the equipment to record sound properly?
Interview: find a quiet place for the shoot and bring the camera as close to the interviewee as the framing allows.
Feature film: choose a type of movie that doesn’t require spoken dialogue.
Make an old-fashioned silent movie, showing the actors‘ muted lines on text slides. You could add music too.
Use voice-over narration that you’ve recorded separately or titles that give extra information about the video material.
Sound editing
It’s very common to use several audio tracks for sound editing. After all, even though we can only see one video track at a time, we are able to hear several sounds simultaneously – dialogue, ambient sound, music and any special effects.
Sounds can be cut, faded or crossfaded. Often sound is extended from one scene into the next to ensure a smooth transition. This is very common in scenes or sequences with music. The music is audible during the transition into the next scene or sequence and then fades out.
You can also use sound to ‚announce‘ the next scene. For example, while we’re observing a person in a house we become aware of the sound of an engine in the background. In the next scene we see a car approaching the house.
Avoid situations where the audience can hear a sound but can’t see where it’s coming from, for example a dog’s barking. This can distract the viewer from what is actually happening in the scene. Try to show all audible sound sources in the video, for example by adding a shot of the barking dog at the editing stage.
Where there are several different sounds in one scene, make sure they are set to the correct levels. For example, ambient sound or music shouldn’t be too loud when compared to the sound of a conversation.
The sound from small computer speakers is very different from what a home-cinema sound system can produce. Check the sound of your film on different types of speakers and sound systems, and try to find a middle ground that offers good sound quality across the board.
Common mistakes
You didn’t place the recording device in a way that gives you the best sound possible.
The level of the dialogue/interview/narration and the level of the ambient sound or music aren’t well balanced at the editing stage. For example, the ambient sound or the music is too loud, and the spoken word is incomprehensible.
The film is ‚overloaded‘ with music. Sometimes less is more!
Using music without the copyright owner’s permission. Some film festivals and internet platforms won’t allow you to publish or screen your film, and you may have to pay a fine.
Exercises
Watch different types of video and film, and listen out carefully for the different sound sources.
Discover what sound features and adjustment options your camera has.
Try to get an external microphone or a portable recording device, and learn how to use it.
handy portable recorder, boom pole, off voice, ambient sound, jack / small jack, XLR connector, RCA or cinch connector, sound levels, Mic NR, wind or low cut function, Mic att (attenuation) function, Omnidirectional microphone, unidirectional microphone, bidirectional, cardioid, shotgun, wireless microphone, handy portable recorder
Cookie-Zustimmung verwalten - Sie können die Seite auch ohne Cookies nutzen!
Diese Seite wird gerade umgebaut. // Site under construction. // Spletna stran je v prenovi. // Yapim Asamasindadir.
Wir verwenden Cookies, um unsere Website und unseren Service zu optimieren.
Funktional
Immer aktiv
Die technische Speicherung oder der Zugang ist unbedingt erforderlich für den rechtmäßigen Zweck, die Nutzung eines bestimmten Dienstes zu ermöglichen, der vom Teilnehmer oder Nutzer ausdrücklich gewünscht wird, oder für den alleinigen Zweck, die Übertragung einer Nachricht über ein elektronisches Kommunikationsnetz durchzuführen.
Vorlieben
Die technische Speicherung oder der Zugriff ist für den rechtmäßigen Zweck der Speicherung von Präferenzen erforderlich, die nicht vom Abonnenten oder Benutzer angefordert wurden.
Statistiken
Die technische Speicherung oder der Zugriff, der ausschließlich zu statistischen Zwecken erfolgt.Die technische Speicherung oder der Zugriff, der ausschließlich zu anonymen statistischen Zwecken verwendet wird. Ohne eine Vorladung, die freiwillige Zustimmung deines Internetdienstanbieters oder zusätzliche Aufzeichnungen von Dritten können die zu diesem Zweck gespeicherten oder abgerufenen Informationen allein in der Regel nicht dazu verwendet werden, dich zu identifizieren.
Marketing
Die technische Speicherung oder der Zugriff ist erforderlich, um Nutzerprofile zu erstellen, um Werbung zu versenden oder um den Nutzer auf einer Website oder über mehrere Websites hinweg zu ähnlichen Marketingzwecken zu verfolgen.